How to Create a Mirror Shoe Shine
So you’ve purchased some really nice shoes. Congratulations! So what are you going to do to take care of those beauties? Well, you can start by reading our Complete Shoe Care Guide Part1 and Part 2! And now we’ve asked shoe care expert and owner of Pure Polish Products Andy Vaughn to come back and teach us how to get that ultimate final touch: a beautiful mirror shoe shine!

Introduction
There are many ways to achieve an ultimate shine, not all of them are good for your leather. While you can achieve an ultimate shine with a variety of polishes and techniques, I will be showing you how to do it using very thin layers of natural polish combined with water, with the goal of achieving the ultimate shine without sacrificing the integrity of your leather or shortening its lifespan, through either product or technique.
Base Polish
In The Complete Shoe Care Guide Part 1 and Part 2, we covered how to take care of the basics. We showed you how to use cream across the whole of the shoe for protection, shine, and color. And we showed you how to use paste (wax) polish on the toes and heels for additional protection, shine, and color depth.
I’ll be using the same pair of shoes as I did in Part 1 & 2 – Navyboot Calfskin Round-toe Classic Oxfords. They’ve been worn a couple of times since the last article, but still have a good base of cream and paste polish to work from.
If you’re starting on a new pair of shoes without a base, now is the time to take care of that first. So head back and give the first two articles. But since we have a base on these particular shoes, we’re going to jump straight into preparation.
Preparation

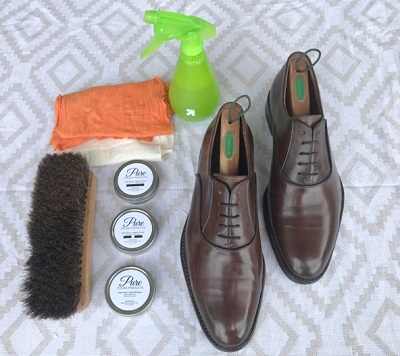
For the ultimate shine, it’s necessary to have:
- A good pair of full-grain leather shoes (with a base polish)
- Horsehair brush
- Clean, thin cotton cloth (muslin, or old t-shirt)
- Clean, thick flannel cloth (soft, lint-free)
- Water spritzer (water dispenser works fine, as well)
- Cream Polish
- Paste (Wax) Polish
- High Shine Paste (Wax) Polish
Step 1: Clean the Surface
Before adding any additional products, you will want to clean the surface of the leather. Start by brushing the shoe with a horsehair brush. This helps remove dust, lint, or other debris that might come between your wax and leather.
After the shoes are brushed and clean, take your thin cotton cloth, and spritz it with a single spray of water (from about 6 inches away). Use the now-damp cloth and gently wipe down the surface of each shoe, to remove any remaining dust particles.
![]()
Step 2: Paste Polish
Using your thin cotton cloth, wrap it around two fingers, keeping it taut on the front. If you have a long enough cloth, you can twist it around the back of your hand and wrap it around and underneath your palm so you can hold it tightly and securely. Dab your fingertips on to the paste (wax) polish.
![]()
Using small “dab” amounts, spread the paste polish around the toes and heels of both shoes. Cover the toe and the non-flexing area of the heel, using smooth – but thin – layers of paste polish.
![]()
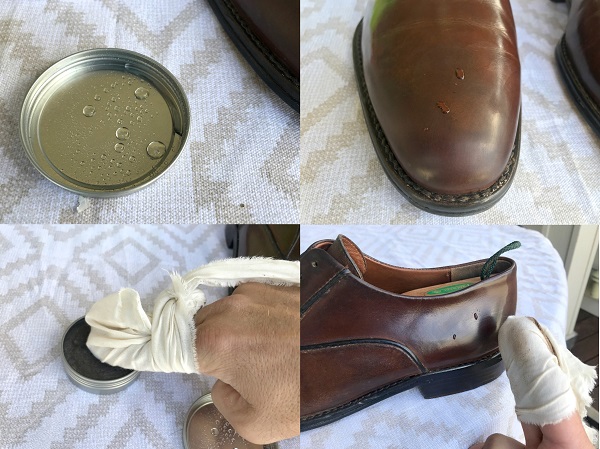
After the polish has been spread evenly around both shoe toes and heels, take a droplet of water (from the water spritzer) and place it on the toe or heel. Dab your fingertip back into the paste/wax, and spread the wax using the water as a lubricant and smoothing agent of the wax layers.

Use small circles and spread the wax and water mixture evenly to form a smooth base layer on both the toe and the heel. It should look smooth and clean when done, not wet, sticky, or foggy.
Step 3: Crease Cleanup
Since these shoes have been worn a few times, the creases have flexed a bit since the last polish. I’m applying a small amount of cream polish using just my fingertips to the creases, ensuring those areas stay protected, while still looking good with the final shine.
![]()
Use the horsehair brush or thin cotton cloth to brush or wipe off any excess cream.
Step 4: Smooth Reflecting
For the “Ultimate Shine” we are going for maximum reflection. Reflection comes from the wax and water being perfectly smooth together. It’s a useful metaphor to think of layering water droplets, as opposed to layering wax. The light reflects through the prism of water and wax together. This is why High Shine Paste waxes don’t usually use pigment or softer oils. They’re designed to allow light to pass through completely to the surface of the leather.
You can achieve this if you already have a solid and smooth wax base to start with, like we accomplished in the first few steps. Since we are going for smoothness, I recommend you use a clean, soft, flannel cloth for your mirror shine. This will allow you to buff very softly, while picking up any imperfections that might otherwise mar your wax. It also allows you to pick up excess moisture, without imparting “wetness” across the shoe.
![]()
We’re using Pure Polish High Shine Paste to achieve the Ultimate Shine. There is no pigment or “soft oils” added to this wax, as its designed for the maximum amount of reflection by not impeding any light, and keeping the wax stiff and clear.
![]()
Finding the right balance between the water and wax and knowing the correct amount of pressure to use comes with practice. Achieving the Ultimate Shine truly is a type of art. And learning what your specific shoes need and how the leather responds to your tools is almost like a musical performance. You’ll get better with experience.
Step 5: Beginning The Mirror
Wrap the flannel cloth around your two fingers, and pull it taut. You need to keep the front-side of your fingertips free from wrinkles, as wrinkles will create imperfections in the wax.
![]()
Spritz the cloth once from about 6 inches distance, until you feel very minimal dampness. Again, give yourself access to a tray of water, which you can use to add water droplets with your fingertips. Gently press your fingertips on to the High Shine Paste. Drop one or two droplets on to the toe of your shoe, and swirl in small circles until the water disappears. Repeat the drop/dab/swirl on the sides, tip, top, and then again in 3 to 4 spots on each heel.
![]()
Trouble-shooting
Do this same process on the toes and heels of both shoes. If the wax starts to appear thick, smeared, or anything beyond slightly “foggy” between drops, then you’re using too much wax. If the water just keeps disappearing, but you don’t appear to have any sort of reflection or shine getting created, then you don’t have a solid enough paste base. The water is just permeating your leather directly. Go back to the “Paste Polish” step and begin again.
![]()
You should immediately be getting some reflection back. The gentle nature of this can be elusive. But with practice, you will get the balance right. One trick if you want to see the wax stability and consistency – maybe you put too much wax in one area and not enough in another – is to apply a little more water than usual, and then run it all the way around the shoe, without your High Shine, using very quick, gentle swirling buffs.
Now, we’re starting to see some serious reflection happening.Repeat the drop/dab/swirl process until the non-flexing parts of the shoe start to feel and look like glass.
![]()
Warning:
While you can “mirror shine” almost forever trying to achieve ultimate smoothness, there’s a point of diminishing returns. Consequently, with each round of shining, you run the risk of using too much wax, too much water, or too much pressure, and cracking the layers of wax you applied to create your beautiful shine. Know when to quit when you’re getting close to the desired result. Each time you shine your shoes, you’ll learn a little more to help you achieve the desired result.
Step 6: The Ultimate Shine
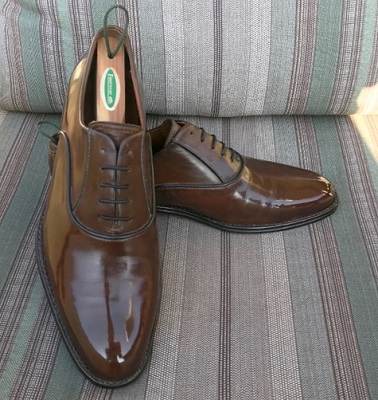
With just a few rounds of High Shine Paste, water, and our smooth and gentle “drop/dab/swirl” technique, we’ve achieved “The Ultimate Shine”.
Tip: It takes a little bit of time for the solvents of the creams and pastes to evaporate. If you let your shoe sit in a cool, shaded area for a few hours, the solvent will fully evaporate and any fogginess under the glassy shine should disappear. You can then give a final buffing with just a clean section of flannel cloth (slightly damp from a single spritz of water). This is the perfect finishing technique to a perfect shine.
Wearing The Ultimate Shine
You’ll still get normal creases in the leather that come from just wearing your shoes. There’s really no way to avoid those. However, now your shine, especially on the toe-cap and heel, will reflect light to maximum-effect. It will definitely attract (positive!) attention and don’t be surprised if a few friends come over to admire their reflections!
![]()
This is a non-sponsored post. Neither Iconic Alternative nor the author were remunerated in any way for the mention of the products in this post. Honestly, I just really like taking care of my shoes. And I use Pure Polish Products, so I can vouch for their quality and effectiveness. Seriously, their High Shine Paste Polish is one of the nicest shoe care products I’ve tried. Plus they all smell great! So when I decided to put together a shoe care guide, I immediately thought of Andy and he was kind enough to say yes!